Your Amazon product title is the most important SEO element on your listing. It’s the first thing customers see, the primary ranking factor, and your biggest opportunity to capture attention and drive clicks.
The stakes are high: Get your title wrong, and you’ll struggle to rank. Get it right, and you’ll dominate search results and drive organic sales.
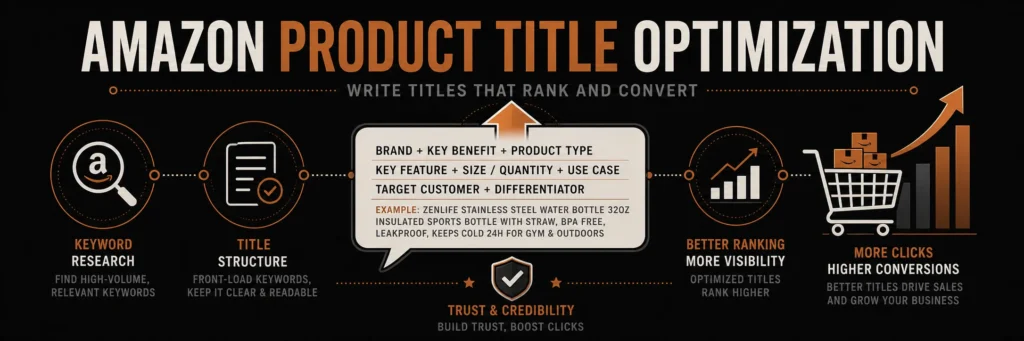
Your product title is the single most important text field on your listing for both ranking and click-through rate. This guide shows you how to write it right.
In this comprehensive guide, we’ll teach you everything you need to know about Amazon product title optimization. You’ll learn proven formulas, best practices, and real examples that rank and convert.
Why Amazon Product Titles Matter
The Impact of Title Optimization:
SEO Impact:
- Primary ranking factor – Amazon’s algorithm heavily weights titles
- First 50 characters get most weight in search
- Keyword placement determines search visibility
- Relevance matching – How well you match customer searches
Conversion Impact:
- First impression – Title is what customers see first
- Click-through rate – Better titles = more clicks
- Trust building – Professional titles build credibility
- Expectation setting – Clear titles reduce returns
The Numbers:
- 70% of shoppers never click past page 1
- Top 3 results get 64% of all clicks
- Title optimization can improve rankings by 20-40%
- Better titles can increase CTR by 15-25%
Amazon Title Requirements and Limits
Character Limits:
- Maximum: 200 characters
- Recommended: Use all 200 characters
- Minimum: At least 50-80 characters for basic info
Format Requirements:
- No HTML – Plain text only
- No special characters – Avoid symbols, emojis
- No promotional text – “Free shipping”, “On sale” (against policy)
- No ALL CAPS – Use proper capitalization
- No misleading claims – Must be accurate
Category-Specific Rules:
- Books: Author, title, edition
- Electronics: Brand, model, key specs
- Apparel: Brand, style, size, color
- Home & Kitchen: Brand, type, key features
The Amazon Title Optimization Formula
Standard Title Structure:
[Brand] + [Primary Keyword] + [Key Feature 1] + [Key Feature 2] + [Target Audience/Use Case] + [Size/Color/Variation]
Breaking Down Each Element:
1. Brand Name
- Placement: Usually first or second
- Purpose: Brand recognition and trust
- Example: “Sony”, “Apple”, “YourBrand”
2. Primary Keyword
- Placement: Within first 50 characters (critical!)
- Purpose: Main search term you want to rank for
- Example: “Wireless Bluetooth Headphones”
3. Key Features
- Placement: After primary keyword
- Purpose: Differentiation and additional keywords
- Example: “Noise Cancelling”, “30-Hour Battery”
4. Target Audience/Use Case
- Placement: Middle to end
- Purpose: Attract specific customer segments
- Example: “for Travel”, “for Gym”, “for Office”
5. Size/Color/Variation
- Placement: End of title
- Purpose: Help customers find exact product
- Example: “Black”, “15-inch”, “10-Pack”
Amazon Title Best Practices
1. Place Primary Keyword in First 50 Characters
Why it matters:
- Amazon gives most weight to early keywords
- First 50 characters appear in search results
- Mobile shows even fewer characters
- Early placement = better ranking
Example: ❌ Bad: “Premium Quality Wireless Bluetooth Headphones with Advanced Noise Cancelling Technology” ✅ Good: “Wireless Bluetooth Headphones, Noise Cancelling Over-Ear Headphones with 30H Battery”
2. Use All 200 Characters
Maximize opportunities:
- More keywords = more ranking chances
- More information = better matching
- More features = higher conversion potential
How to fill 200 characters:
- Include multiple keywords
- Add key features and benefits
- Specify use cases
- Include size/color/variations
3. Include Numbers and Specifics
Specificity converts:
- “30-hour battery” > “long battery”
- “10-pack” > “pack”
- “15-inch” > “large”
- “5.0 Bluetooth” > “Bluetooth”
Why it works:
- Sets clear expectations
- Helps customers find exact product
- Reduces returns
- Improves conversion rate
4. Lead with Benefits When Possible
Benefit-focused titles:
- “Noise Cancelling” (benefit) > “Active Noise Reduction” (feature)
- “Waterproof” (benefit) > “IPX7 Rated” (technical)
- “Lightweight” (benefit) > “0.5 lbs” (spec, but also benefit)
Balance:
- Include both benefits and features
- Use customer language
- Avoid technical jargon (unless necessary)
5. Use Natural Language
Readability matters:
- Titles should read naturally
- Avoid keyword stuffing
- Maintain grammar and flow
- Sound like human writing
Example: ❌ Bad: “Headphones Wireless Bluetooth Noise Cancelling Over Ear” ✅ Good: “Wireless Bluetooth Headphones, Noise Cancelling Over-Ear Headphones with 30H Battery”
6. Include Brand Name Strategically
Brand placement:
- First: If brand is well-known (Sony, Apple)
- Second: If keyword is more important
- Last: If brand is less known
When to include:
- Always include your brand
- Builds brand recognition
- Helps with brand searches
- Required for Brand Registry
7. Avoid Keyword Stuffing
Natural integration:
- Don’t repeat keywords unnecessarily
- Use variations and synonyms
- Maintain readability
- Focus on conversion, not just SEO
Example: ❌ Bad: “Wireless Wireless Bluetooth Bluetooth Headphones Wireless” ✅ Good: “Wireless Bluetooth Headphones, Noise Cancelling Over-Ear with Long Battery Life”
Amazon Title Optimization by Category
Electronics:
Structure: Brand + Product Type + Key Specs + Features + Use Case
Example: “Sony WH-1000XM4 Wireless Bluetooth Headphones, Noise Cancelling Over-Ear Headphones with 30H Battery, Hi-Fi Sound, Quick Charge, for Travel Work Home Office – Black”
Key Elements:
- Brand: Sony
- Product: Wireless Bluetooth Headphones
- Specs: 30H Battery, Quick Charge
- Features: Noise Cancelling, Hi-Fi Sound
- Use: Travel, Work, Home, Office
- Color: Black
Apparel:
Structure: Brand + Product Type + Style + Material + Size/Color
Example: “adidas Men’s Ultraboost 22 Running Shoes, Lightweight Athletic Sneakers with Boost Cushioning, Primeknit Upper, Size 10, Black/White”
Key Elements:
- Brand: adidas
- Product: Running Shoes
- Style: Athletic Sneakers
- Features: Lightweight, Boost Cushioning, Primeknit
- Size: 10
- Color: Black/White
Home & Kitchen:
Structure: Brand + Product Type + Key Features + Capacity/Size + Use Case
Example: “Instant Pot Duo 7-in-1 Electric Pressure Cooker, Slow Cooker, Rice Cooker, Steamer, Sauté, Yogurt Maker, Warmer & Sterilizer, 6 Quart, Stainless Steel”
Key Elements:
- Brand: Instant Pot
- Product: Pressure Cooker
- Features: 7-in-1 functions listed
- Size: 6 Quart
- Material: Stainless Steel
Step-by-Step: Optimizing Your Amazon Title
Step 1: Research Primary Keywords
Find your main keyword:
- Use Helium 10 or Jungle Scout
- Check Amazon autocomplete
- Analyze competitor titles
- Review customer search terms
Choose:
- High search volume
- Relevant to your product
- Commercial intent
- Achievable to rank for
Step 2: Analyze Top Competitors
Study top 10 listings:
- What keywords do they use?
- How do they structure titles?
- What features do they highlight?
- What’s their title length?
Learn from:
- Successful title patterns
- Keyword placement
- Feature prioritization
- Use case mentions
Step 3: List Key Features and Benefits
Brainstorm:
- Top 5-7 product features
- Main benefits to customers
- Unique selling points
- Use cases and applications
Prioritize:
- Most important features first
- Benefits over features when possible
- Customer language over technical terms
Step 4: Identify Target Audience
Define:
- Who buys this product?
- What are their use cases?
- Where do they use it?
- What problems does it solve?
Include in title:
- “for Travel”, “for Gym”, “for Office”
- “Professional”, “Home Use”, “Commercial”
- “Beginner”, “Advanced”, “Expert”
Step 5: Build Your Title
Follow the formula:
- Start with primary keyword (first 50 chars)
- Add brand name (if not first)
- Include key features
- Add use cases
- End with size/color/variation
Check:
- Primary keyword in first 50 characters ✓
- All 200 characters used ✓
- Natural and readable ✓
- No keyword stuffing ✓
- Includes brand ✓
Step 6: Test and Refine
After publishing:
- Monitor keyword rankings
- Track click-through rates
- Analyze conversion rates
- A/B test variations
- Update based on data
Common Title Optimization Mistakes
1. Primary Keyword Not in First 50 Characters
❌ Mistake: “Premium Quality [Brand] Wireless Bluetooth Headphones…” ✅ Solution: “Wireless Bluetooth Headphones [Brand] Premium Quality…”
2. Not Using All 200 Characters
❌ Mistake: “Wireless Headphones” (only 20 characters) ✅ Solution: Fill all 200 characters with relevant keywords
3. Keyword Stuffing
❌ Mistake: “Wireless Wireless Bluetooth Bluetooth Headphones Wireless” ✅ Solution: Natural integration: “Wireless Bluetooth Headphones, Noise Cancelling…”
4. Too Generic
❌ Mistake: “Headphones” ✅ Solution: “Wireless Bluetooth Headphones, Noise Cancelling Over-Ear with 30H Battery”
5. Missing Brand
❌ Mistake: No brand name in title ✅ Solution: Always include your brand
6. Using Prohibited Terms
❌ Mistake: “Free Shipping”, “On Sale”, “Best Seller” ✅ Solution: Only product attributes, no promotional text
7. Ignoring Mobile
❌ Mistake: Long, complex title that’s cut off on mobile ✅ Solution: Ensure first 50-80 characters are compelling
Advanced Title Optimization Strategies
1. A/B Testing Titles
Test variations:
- Different keyword placements
- Various feature orders
- Different use case mentions
- Test for 2-4 weeks each
- Measure CTR and conversions
2. Seasonal Optimization
Update for seasons:
- Add “Holiday”, “Gift” in Q4
- Add “Summer”, “Travel” in summer
- Add “Back to School” in August
- Remove after season
3. Competitor Gap Analysis
Find opportunities:
- Keywords competitors use but you don’t
- Features they highlight
- Use cases they mention
- Test in your title
4. Customer Language Matching
Use real customer terms:
- Extract from reviews
- Use Q&A language
- Match search patterns
- Natural over technical
Measuring Title Optimization Success
Key Metrics:
- Keyword Rankings
- Track positions for title keywords
- Monitor weekly
- Identify winning/losing keywords
- Click-Through Rate (CTR)
- Impressions vs clicks
- Higher CTR = better title
- Target: 0.5-1%+ CTR
- Conversion Rate
- Clicks vs sales
- Better titles = more conversions
- Monitor in Seller Central
- Organic Traffic
- Sessions from organic search
- Compare before/after
- Track growth over time
Amazon Title Optimization Checklist
Use this for every product:
Research Phase
Creation Phase
Optimization Phase
Conclusion: Write Titles That Rank and Convert
Amazon product title optimization is both art and science. The right title can catapult your product to page 1, while a poor title can keep you invisible.
Key Principles:
- Primary keyword first – Within first 50 characters
- Use all 200 characters – Maximize opportunities
- Natural and readable – Balance SEO with conversion
- Include specifics – Numbers, features, use cases
- Test and optimize – Data tells you what works
Remember: Your title must rank AND convert. It’s not enough to show up in search—you need to get clicks and sales.
Need Help with Amazon Title Optimization?
Our Amazon SEO optimization service includes strategic title optimization based on keyword research, competitor analysis, and conversion best practices. We’ll help you create titles that rank on page 1 and convert browsers into buyers.
Amazon product images are your first opportunity to make a sale. With millions of products competing for attention, high-quality, conversion-optimized images can be the difference between a bestseller and a product that never gets noticed. This comprehensive guide covers everything you need to know about creating Amazon product images that convert.
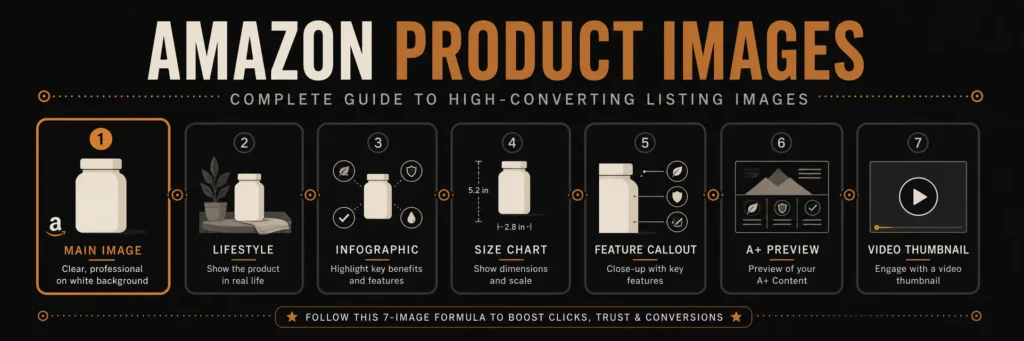
Your main image determines your click-through rate. Every other image in the stack determines whether that click becomes a sale. This guide covers all seven slots.
Why Amazon Product Images Matter
Impact on Sales
- 85% of purchase decisions are influenced by product images
- Products with high-quality images see 30-40% higher conversion rates
- Images are the primary factor customers use to evaluate products online
- Poor images can lead to returns and negative reviews
SEO and Discoverability
- Amazon’s A9 algorithm considers image quality in ranking
- Better images lead to higher click-through rates from search results
- Images with proper optimization can improve search visibility
Amazon Product Image Requirements
Technical Specifications
Main Product Image (Image 1)
- Format: JPEG or PNG
- Color Mode: RGB (not CMYK)
- Minimum Size: 1000 pixels on the longest side
- Maximum Size: 10,000 pixels on the longest side
- Aspect Ratio: 1:1 (square) recommended
- File Size: Under 10MB
- Background: Pure white (RGB: 255, 255, 255)
- Content: Product only, no text, graphics, or lifestyle elements
Additional Images (Images 2-9)
- Same technical requirements as main image
- Can include lifestyle images, infographics, and text overlays
- Should showcase different angles, features, and use cases
Content Requirements
What’s Allowed
- Product from multiple angles
- Product in use (lifestyle images)
- Size comparison images
- Feature callouts and infographics
- Text overlays explaining benefits
- Before/after comparisons
What’s Prohibited
- Contact information (phone, email, website)
- Shipping information
- Pricing information
- Customer reviews or testimonials
- Amazon logos or branding
- Competitor comparisons
- Time-sensitive information (sales, limited time offers)
Types of Amazon Product Images
1. Main Product Image (Hero Shot)
The main image is your product’s first impression. It should:
- Show the product clearly on white background
- Fill 85% of the frame
- Be well-lit with no shadows
- Show the product in its best angle
- Be high resolution and sharp
2. Lifestyle Images
Show your product in real-world use:
- Product being used by people
- Product in natural settings
- Emotional connection with target audience
- Demonstrates scale and context
3. Feature Highlight Images
Create images that showcase key features:
- Close-up shots of important features
- Infographics explaining benefits
- Comparison images (before/after, with/without)
- Technical specifications visually presented
4. Size and Scale Images
Help customers understand product dimensions:
- Product next to common objects (coin, hand, etc.)
- Size comparison charts
- Multiple product sizes shown together
- Packaging and contents displayed
5. Detail and Quality Images
Showcase product quality and craftsmanship:
- Close-up texture shots
- Material quality details
- Build quality demonstrations
- Premium finish highlights
Amazon Product Photography Best Practices
Lighting
- Use soft, diffused lighting to avoid harsh shadows
- Natural light works well for lifestyle images
- Studio lighting with softboxes for main product shots
- Avoid overexposure or underexposure
- Ensure consistent lighting across all images
Composition
- Follow the rule of thirds for interesting compositions
- Leave appropriate white space around product
- Ensure product is the clear focal point
- Use leading lines to guide the eye
- Maintain consistent styling across all images
Background
- Pure white (RGB 255, 255, 255) for main image
- Lifestyle images can have colored or textured backgrounds
- Ensure background doesn’t distract from product
- Use depth of field to blur backgrounds in lifestyle shots
Product Presentation
- Clean and polish product before shooting
- Remove all labels, stickers, and packaging (unless showing packaging)
- Position product in its most flattering angle
- Show product in its best condition
- Include all components if it’s a set
Creating High-Converting Amazon Images
Image 1: Main Product Image
Purpose: Get clicks from search results
Best Practices:
- Pure white background (RGB 255, 255, 255)
- Product fills 85% of frame
- High resolution (at least 2000x2000px)
- Professional lighting with no shadows
- Sharp focus throughout
- Show product’s best angle
Image 2: Lifestyle/In-Use Image
Purpose: Show product in real-world context
Best Practices:
- Show product being used naturally
- Include target customer if possible
- Create emotional connection
- Demonstrate scale and context
- High-quality, professional photography
Image 3: Feature Highlight
Purpose: Showcase key selling points
Best Practices:
- Highlight 2-3 main features
- Use clear, readable text overlays
- Visual callouts pointing to features
- Benefit-focused messaging
- Professional design
Image 4: Size/Scale Reference
Purpose: Help customers understand dimensions
Best Practices:
- Show product next to common objects
- Include measurements if helpful
- Show multiple sizes if applicable
- Clear, easy-to-understand comparisons
Image 5: Detail/Quality Shot
Purpose: Demonstrate quality and craftsmanship
Best Practices:
- Close-up of premium materials
- Texture and finish details
- Build quality highlights
- Professional macro photography
Image 6: Additional Features
Purpose: Show secondary features and benefits
Best Practices:
- Additional feature callouts
- Use cases and applications
- Technical specifications
- Compatibility information
Image 7: Comparison/Before-After
Purpose: Show transformation or improvement
Best Practices:
- Before and after comparisons
- With vs. without product
- Problem and solution visualization
- Clear, side-by-side layout
Amazon Image Optimization for SEO
File Naming
Use descriptive file names with keywords:
- Good:
wireless-headphones-premium-black-main.jpg - Bad:
IMG_1234.jpgorproduct1.jpg
Alt Text
While Amazon doesn’t use traditional alt text, optimize image content:
- Include keywords naturally in infographics
- Use text overlays with relevant keywords
- Ensure images support your listing’s keyword strategy
Image Quality and Speed
- Optimize file size without losing quality
- Use JPEG for photos, PNG for graphics with text
- Compress images appropriately
- Ensure fast loading times
Common Amazon Image Mistakes
Mistake 1: Poor Main Image
- Not pure white background
- Product too small in frame
- Low resolution or blurry
- Shadows or poor lighting
- Cluttered composition
Mistake 2: Missing Lifestyle Images
- Only showing product on white
- No context or use cases
- Missing emotional connection
- Doesn’t show scale
Mistake 3: Overwhelming Infographics
- Too much text on images
- Cluttered design
- Hard to read on mobile
- Information overload
Mistake 4: Inconsistent Style
- Different lighting across images
- Inconsistent product presentation
- Mixing professional and amateur photos
- No cohesive visual story
Mistake 5: Ignoring Mobile View
- Text too small on mobile
- Important details cut off
- Not optimized for small screens
- Poor mobile user experience
Tools for Amazon Product Photography
Photography Equipment
- Camera: DSLR or mirrorless (minimum 24MP)
- Lens: Macro lens for detail shots, standard for lifestyle
- Lighting: Softbox lighting kit or natural light setup
- Background: White seamless paper or backdrop
- Tripod: For consistent positioning and sharp images
Editing Software
- Adobe Photoshop: Professional image editing
- Adobe Lightroom: Batch processing and color correction
- Canva: For infographics and text overlays
- Remove.bg: Background removal tool
- TinyPNG: Image compression
Amazon-Specific Tools
- Amazon Image Requirements Checker: Verify image compliance
- A+ Content Designer: For enhanced brand content images
- Seller Central Image Uploader: Optimized upload process
DIY vs. Professional Photography
When to DIY
- Simple products with straightforward photography needs
- Limited budget for initial launch
- Testing product-market fit
- Basic white background shots
When to Hire Professionals
- Complex products requiring expertise
- Need for high-end lifestyle photography
- Competing in competitive categories
- Scaling multiple products
- Brand positioning requires premium imagery
A+ Content Images
Enhanced Brand Content Requirements
- Minimum: 5 images for A+ Content
- Maximum: 9 modules with multiple images
- Format: JPEG or PNG
- Size: Minimum 1000px width
- Content: Brand storytelling, comparisons, lifestyle
A+ Content Image Best Practices
- Tell your brand story
- Show product benefits visually
- Include comparison charts
- Use lifestyle imagery
- Maintain brand consistency
Mobile Optimization for Amazon Images
Mobile Considerations
- Text Size: Ensure text is readable on small screens (minimum 14pt)
- Image Clarity: High resolution for retina displays
- Composition: Important elements centered and visible
- File Size: Optimize for mobile loading speeds
- Aspect Ratio: Consider mobile viewing orientation
Testing and Optimizing Images
A/B Testing Images
- Test different main images
- Compare lifestyle vs. product-only
- Test different feature highlights
- Measure click-through rates
- Track conversion impact
Key Metrics to Track
- Click-Through Rate: How many searchers click your listing
- Conversion Rate: How many viewers purchase
- Return Rate: High returns might indicate image issues
- Review Mentions: Customers commenting on image accuracy
Image Refresh Strategy
When to Update Images
- Low conversion rates
- High return rates due to “not as described”
- New product features or improvements
- Seasonal updates needed
- Competitor analysis shows better images
- Algorithm changes affecting image importance
How to Refresh
- Analyze current image performance
- Research competitor images
- Identify improvement opportunities
- Create new image set
- A/B test new vs. old images
- Implement winning images
Checklist: Amazon Product Image Optimization
Common Questions About Amazon Product Images
How many images should I use?
Use all 9 image slots if possible. More images provide more opportunities to convert customers and answer questions.
Can I use the same images for variations?
Yes, but consider customizing images for different colors or sizes to show the specific variation.
How often should I update product images?
Review images quarterly or when you notice performance issues. Update immediately if you receive feedback about image accuracy.
Do images affect Amazon ranking?
Yes, indirectly. Better images lead to higher CTR and conversion rates, which positively impact ranking.
Conclusion
Amazon product images are critical for success on the platform. By following Amazon’s requirements, implementing best practices, and continuously optimizing based on performance data, you can create images that not only comply with guidelines but also drive conversions and sales.
Invest time and resources in creating high-quality product images. The return on investment from improved conversion rates and reduced returns will far outweigh the initial cost.
Need professional Amazon product photography? Contact advertpreneur for expert Amazon listing image services. We create high-converting product images that boost sales and improve conversion rates.
Amazon bullet points are your product’s sales pitch in 200 characters or less. They’re the first thing customers read after your title, and they can make or break a sale. This guide will teach you how to write compelling bullet points that convert browsers into buyers.
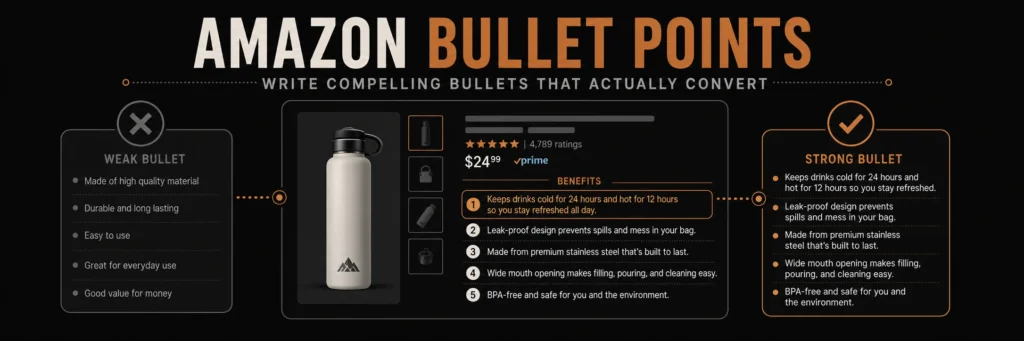
Amazon bullet points are read by both the algorithm and the shopper. Writing them well means satisfying both at the same time. This guide shows you exactly how.
Why Amazon Bullet Points Matter
Impact on Sales
- Bullet points are read by 80% of shoppers before making a purchase decision
- Well-written bullets can increase conversion rates by 20-30%
- Bullets help customers quickly understand product benefits
- They’re crucial for mobile shoppers who scan content quickly
SEO Benefits
- Bullet points are indexed by Amazon’s A9 algorithm
- Keywords in bullets improve search visibility
- Help products rank for long-tail keywords
- Support overall listing optimization
Amazon Bullet Point Requirements
Character Limits
- Maximum: 200 characters per bullet point
- Recommended: 150-180 characters for optimal readability
- Minimum: Use at least 100 characters to maximize SEO value
Number of Bullets
- Maximum: 5 bullet points per listing
- Minimum: Use all 5 bullets for maximum impact
- Best Practice: Fill all 5 bullets with valuable information
Formatting Rules
- No HTML formatting allowed
- No special characters (bullets, arrows, etc.) in first character
- Plain text only
- Can use capital letters for emphasis
- Line breaks are automatically added
Structure of High-Converting Bullet Points
The Formula
Feature + Benefit + Proof/Detail = Conversion
Each bullet should:
- Lead with the feature (what it is)
- Explain the benefit (why it matters)
- Add proof or detail (credibility or specifics)
Example Structure
Bad: “Wireless headphones” Good: “WIRELESS FREEDOM: Bluetooth 5.0 technology provides stable connection up to 33 feet, perfect for workouts and daily commutes without tangled cords”
What to Include in Each Bullet Point
Bullet 1: Primary Benefit or Unique Selling Proposition
- Your product’s main differentiator
- The #1 reason to buy
- What makes you stand out from competitors
- Most important feature/benefit
Bullet 2: Key Features and Specifications
- Important technical details
- Size, dimensions, capacity
- Material quality
- Technical specifications
Bullet 3: Use Cases and Applications
- Who it’s for
- When to use it
- Problem it solves
- Ideal customer scenarios
Bullet 4: Quality and Durability
- Build quality
- Material quality
- Longevity and durability
- Premium features
Bullet 5: Additional Value or Guarantee
- Bonus features
- Included accessories
- Warranty information
- Customer support
- Money-back guarantee
Writing Techniques for Compelling Bullets
1. Lead with Keywords
Start each bullet with your most important keyword:
- “WIRELESS BLUETOOTH HEADPHONES: Advanced 5.0 technology…”
- “PREMIUM LEATHER WALLET: Genuine Italian leather construction…”
2. Use Power Words
Incorporate words that create emotion and urgency:
- Premium, Professional, Advanced, Ultimate, Exclusive
- Guaranteed, Proven, Tested, Certified, Award-Winning
- Instant, Fast, Quick, Easy, Simple
3. Be Specific
Avoid vague claims. Use numbers and specifics:
- Bad: “Long battery life”
- Good: “40-HOUR BATTERY LIFE: Rechargeable lithium battery provides up to 40 hours of continuous playback on a single charge”
4. Focus on Benefits, Not Just Features
Always explain why the feature matters:
- Feature: “Waterproof IPX7 rating”
- Benefit: “WATERPROOF DESIGN: IPX7 rating means you can use these headphones in the rain, at the pool, or during intense workouts without worry”
5. Address Objections
Anticipate and answer common concerns:
- Quality concerns → Emphasize materials and construction
- Size concerns → Provide dimensions and comparisons
- Use concerns → Explain use cases and applications
- Value concerns → Highlight included accessories and value
Amazon Bullet Point Templates
Template 1: Feature-Focused
[KEYWORD]: [Feature description] provides [benefit] for [use case], making it perfect for [target customer]
Example: “NOISE CANCELLATION: Advanced active noise cancellation technology blocks up to 95% of ambient noise, creating an immersive listening experience perfect for travelers and office workers”
Template 2: Problem-Solution
[PROBLEM SOLVED]: [Product feature] eliminates [problem] by [how it works], ensuring [benefit] for [target customer]
Example: “TANGLED CORD SOLUTION: Tangle-free cable design with reinforced connectors eliminates frustrating cord tangles, ensuring reliable performance during workouts and daily use”
Template 3: Comparison
[COMPETITIVE ADVANTAGE]: Unlike [competitor feature], our [product feature] delivers [benefit] through [unique method], providing [result]
Example: “SUPERIOR COMFORT: Unlike standard memory foam, our gel-infused memory foam adapts to your body temperature, providing personalized support that reduces pressure points by 40%”
Keyword Optimization in Bullet Points
Primary Keywords
Include your main keyword in at least 2-3 bullet points:
- Natural integration (not keyword stuffing)
- Vary placement (beginning, middle, end)
- Use variations and synonyms
Long-Tail Keywords
Incorporate long-tail keywords naturally:
- “wireless bluetooth headphones for running”
- “waterproof phone case for swimming”
- “ergonomic office chair for back pain”
Related Keywords
Include semantically related terms:
- For “headphones”: audio, sound, music, listening, earbuds
- For “laptop”: computer, notebook, portable, productivity
Common Bullet Point Mistakes
Mistake 1: Being Too Vague
Bad: “High quality product” Good: “PREMIUM CONSTRUCTION: Aircraft-grade aluminum body with reinforced corners withstands drops up to 6 feet, ensuring durability for years of daily use”
Mistake 2: Focusing Only on Features
Bad: “Bluetooth 5.0 technology” Good: “LATEST BLUETOOTH 5.0: Advanced wireless technology provides stable connection up to 33 feet with zero audio lag, perfect for workouts without phone in pocket”
Mistake 3: Ignoring Character Limits
- Going over 200 characters gets cut off
- Too short (under 100) wastes valuable space
- Aim for 150-180 characters for optimal impact
Mistake 4: Not Using All 5 Bullets
- Missing opportunities to convert
- Wasting SEO value
- Appearing less professional
- Always use all 5 bullets
Mistake 5: Copying Competitors
- Your product is unique
- Copying doesn’t highlight your advantages
- Create original, benefit-focused content
- Stand out from the competition
Mobile Optimization for Bullet Points
Mobile Considerations
- Shorter sentences: Easier to read on small screens
- Clear structure: Each bullet should stand alone
- Scannable format: Use capital letters for keywords
- Quick benefits: Mobile users scan quickly
Mobile Best Practices
- Lead with the most important benefit
- Keep sentences concise
- Use numbers and specifics
- Make each bullet independently valuable
A/B Testing Bullet Points
What to Test
- Different keyword placements
- Benefit-focused vs. feature-focused
- Emotional vs. rational appeals
- Length variations
- Power word usage
How to Test
- Create two versions of bullet points
- Run both versions for 2-4 weeks
- Measure conversion rates
- Implement winning version
- Continue testing and optimizing
Bullet Points for Different Product Categories
Electronics
- Focus on technical specifications
- Highlight compatibility
- Emphasize performance metrics
- Include connectivity features
Home & Kitchen
- Emphasize ease of use
- Highlight durability
- Focus on convenience
- Include safety features
Clothing & Accessories
- Focus on materials and quality
- Highlight fit and comfort
- Emphasize style and versatility
- Include care instructions
Health & Personal Care
- Focus on benefits and results
- Highlight safety and ingredients
- Emphasize ease of use
- Include usage instructions
Bullet Points and Amazon A9 Algorithm
How Bullets Affect Ranking
- Keywords in bullets are indexed
- Better bullets = higher conversion = better ranking
- Bullets support overall listing optimization
- Help rank for long-tail keywords
SEO Best Practices
- Include primary keyword in 2-3 bullets
- Use related keywords naturally
- Incorporate long-tail keywords
- Maintain keyword density (2-3% natural)
Writing Process for Bullet Points
Step 1: Research
- Analyze competitor bullet points
- Identify unique selling propositions
- List all features and benefits
- Research target keywords
Step 2: Prioritize
- Rank features by importance
- Identify top 5 benefits
- Determine unique differentiators
- Select most valuable keywords
Step 3: Write
- Use templates for structure
- Focus on benefits over features
- Include specifics and numbers
- Address customer objections
Step 4: Optimize
- Check character count
- Verify keyword inclusion
- Ensure mobile readability
- Test for clarity and impact
Step 5: Refine
- Remove unnecessary words
- Strengthen power words
- Improve flow and readability
- Final keyword check
Checklist: Amazon Bullet Point Optimization
Common Questions About Amazon Bullet Points
Can I use emojis in bullet points?
No, Amazon doesn’t allow emojis or special characters in bullet points. Use plain text only.
How often should I update bullet points?
Review quarterly or when you notice conversion issues. Update immediately if you receive customer feedback about clarity.
Should I use all caps for keywords?
Using all caps for the first few words can help with scanning and emphasis, but don’t overdo it. Use strategically.
Do bullet points affect Amazon ranking?
Yes, indirectly. Better bullets improve conversion rates, which positively impacts ranking. Keywords in bullets are also indexed.
Conclusion
Amazon bullet points are a critical conversion tool that can significantly impact your sales. By focusing on benefits, using specific details, optimizing for keywords, and addressing customer needs, you can create bullet points that not only inform but also persuade.
Take time to craft compelling bullet points. The investment in well-written bullets will pay off through improved conversion rates, better search visibility, and increased sales.
Need help optimizing your Amazon listings? Contact advertpreneur for expert Amazon listing optimization services. We create conversion-focused bullet points and product descriptions that boost sales.